Wednesday 31 December 2008

Olympus E30 DSLR Digital Camera: January 2009 !!!

The details of a forthcoming Olympus digital SLR camera have been released by an online retailer. Although the manufacturer yet to make an official announcement about the camera, photography online retailer Adorama Olympus said announced that the mid-range shooter is called E30 and sports a 12.3-megapixel sensor.

Olympus E30 DSLR Digital Camera

Adorama said that the E30 will use the Four Thirds lens exchange system, like the E3, which began in November 2007 and that the E30 seems destined to replace.

The E30 also feature a 11-point autofocus system, a feature already present in the 10.1-megapixel E3. Image stabilization and face recognition will also be present, although this is not a surprise. There was also mention of a live view shooting mode and 5F / s option to break break.

Adorama said the Olympus E30 will be launched in January and will cost around $ 1300 (£ 820 / € 1000).

Wednesday 24 December 2008

Tutorial Photoshop-Photo Retouch


In this tutorial we will create something like glamour photo retouch tutorial. We will use Adobe Photoshop as our tool of choice for retouching a photo and making almost a ready design out of it. You will have some files for support like some brushes and the initial photo itself to practice on. So let's start out talk on making PS photo retouch.
Here is the photo I found in the internet on Comfight.com, a very useful service if you want to find any photos.

Here it is. A very mystical mood photo but in the same time very bright (the eyes have it).
Now the first thing I'm going to do here is to change my hue to a little bit "into the blue", just a little bit. It's not really necessary for you to do this, depending on the monitor you got and so on, but I feel that it will be better if the picture will be bluer saturated.

I will turn OFF the saturation layer for now. Now if you look and the initial picture you will probably notice that the light on the girls face is too strong, too much white.
I will fix that, I'm going to use a low flow (about 20% flow depending on the tablet and the brush settings) brush. So create a new layer and start. If this is your first tutorial to read it will be a little bit harder. Anyway I'll try to give you the possibility to download this mask, shall we say, file.

Os just watch the pictures now.

also wanted to give a little bit of texture to the face.

And there we go:

So we got rid of this face lighting a little bit. Now we have that face color and form balance. Next step: the background. Let's make ha background a little more artistic. I have a special method for this one. I will use complex brushes for that. Listen to this: for my basic brush I will chose standard PS soft edged brush with all the dynamics possible set to pen pressure.
For the second brush (dual brush) I will take brush 600 that I have in my list. This is a real flat one.

Create a new layer just now.

And here is the amazing effect that my brush does.

The next brush to use will be a little dot scatter brush.

Create a new layer to use a new brush on.
Before using this brush I will apply a layer style to my new balk layer. Outer glow:

And here is my brush with outer glow already. You can now paint with outer glow with any brush. But all we need is little sparkles made with scatter dot brush.

Create another layer.

The idea here is to create a blast of color texture.

Step 1: tap several times with splatter brush.

Warp the whole layer.

Do the same thing on a different layer, oh yea, and do change the brush color to something like skin tone.

Erase the effect around the face on these 2 layers.

Now the final thing we can do here is to pick up a soft brush, set the flow jitter to about 1%, select the Overlay color mode, and to paint over the whole blue on the image.

So this is it on our photo retouch, hope you found out something useful from this tutorial. And remember that such applications as Photoshop offer a wide range of color manipulations. SO practice your color and see you next time.

Thursday 11 December 2008

Digital Cameras - To Click and Pose

When it comes to the photography field, some years ago, people used bulky cameras to take photographs. Those heavy weight cameras were unable to carry and they did not offer clear and perfect images to their users. To avoid all these inconveniences, digital cameras are introduced in the market with high performance and quality. You can take bright images even in poor light condition with these cameras. As photography is a common hobby for most of the people across the world, the popularity of these innovative devices has been increasing day by day. These sleek cameras offer crystal clear images and are equipped with all the user-friendly multi-functional features like recording videos of moving and still moments, editing and saving images etc. As these sleek devices come with removable storage capacity, you can save thousands of images and video clips on these cameras. You can delete unwanted photos to free the memory capacity. Some of the removable storage technologies that are available in the market are the Multi-Media Card (MMC), Compact Flash (CF-I), Memory Stick, USB flash drive and xD-Picture Card (xD).
The present day market is offering numerous types of digital cameras like digital single lens reflex cameras, compact digital cameras, ultra compacts, line-scan camera, bridge cameras, digital SLRs and compact.
Most of the latest digital cameras come with USB port connectivity that can be used to connect cameras directly to computers to transfer data. Some of the advanced technology cameras have PictBridge standard that enables you to send images directly to a computer printer which is capable of a PictBridge standard without taking the help of computer. To take different types of images depending on the situations, the digital cameras have several mode options to choose from like exposure, light metering, white balance, aperture and focusing. They operate on rechargeable batteries which are small enough to fit in cameras.
Now-a-days, these digital camera features are equipped in most of the mobile phones, which are known as camera mobile phones. They act like digital cameras, but the image storage capacity of these handsets is less than the cameras. Some of the latest electronic devices that come with in-built-camera features are Blackberry devices, camcorders, laptops and PDAs. The common format for most of the digital cameras is JPEG (Joint Photography Experts Group) standard.
The Wespro Digital Camera, Sony Cyber-shot DSC-W130 Silver Digital Camera, Canon Power Shot A590 IS, Fuji film Fine Pix Z20FD and Sony DSC-W110 Silver Digital Camera are some of the cheap digital cameras that are available at affordable prices in the market. These cheap Digital cameras come with high-end technology and offer you great flexibility to carry them with you wherever you go.
To have a close and clear view of all the
cheap digital cameras, visiting related websites over the Internet is the best source than the others. This helps you to get the best deal on purchasing the best quality digital camera

Wednesday 26 November 2008

Setting Type Around a Circle

The problem with Bottom Circles... Many times it's difficult getting the type to work on the bottom of a circle। This takes a little patience and careful dexterity. Let's start with the type already set along the circle (as described previously) at the top of the circle. You should now copy that layer and then hide it. This preserves all your hard work on the top circle, which we'll be using again later.

Text at TOP of circle

Take that Direct Select tool (sometimes called "path selection tool") and
* hover at the origin point until you see the cursor with the black arrow.
* Click and drag the type down.
* Don't release the mouse until the text is where you want it.
* Go ahead। Move it around. You'll see you can get all kinds of results just in the way you drag it.


If a portion of the type goes beyond an anchor, you'll need to move that anchor. (See that dot? That's it!)
* Release the mouse and move the cursor to the END of the type.
* Drag away from the type and you'll see the rest of it appear.

Now, you have type at the bottom of a circle.

At this point you can select the type and key in the legend for the bottom of your circle. This leaves us with a layer for the type on the top, and a layer with the type on the bottom.

Fine-tuning Circular Type & the layout

Your bottom type may have become scruntched. (Slang term for "squeezed together.") So you'll need to select it with the Text Tool, and on the Character Palette, adjust the letter spacing or Tracking.

I've had to go all the way to 100 because the slab serifs in the Rockwell font are very unforgiving. With some more rounded fonts you may not have as much of a problem.
* Tip: Tracking adjusts Letter Spacing across a string of characters... not to be confused with Kerning which only affects the space between two characters!

Tracking to free the type

To finish, you can use the Direct Select tool once again to shift, stretch and adjust the circles to fit your needs. In this simple example, I've had to slightly stretch the circle to get a better visual fit with the photo. Here, I'm adjusting the left anchor of the circle -- pulling it out for a better fit.

I use the "nudge" technique... .
* Click once on an anchor point with the Direct Select pointer
* Tap Arrow keys on the keyboard "Nudge" the anchor in the direction desired
* Remember to count your taps on the arrow key. Use the same number of arrow-key-taps for the right side.

adjusting the type

Note that the path and anchors will move, leaving the type where it was. If you'll pause at the destination, the type will snap into position.

Tuesday 18 November 2008

Membuat obyek sederhana

Membuat segi empat

1. Pilih Rectangle Marquee Tool.
2. Drag-lah sehingga membentuk segi empat.

3. Untuk mewarnai segiempat tersebut gunakan Paint Bucket Tool. Caranya klik Paint Bucket Tool, lalu klik pada area segi empat tersebut (ditandai dengan garis putus-putus).

4. Untuk membuat gambar seperti di bawah ini, caranya : seperti langkah 1 dan 2 di atas. Setelah itu klik menu Edit > Stroke. Pada text box Widt Isi dengan (misalnya) 3. Klik OK.

Membuat bujur sangkar

Untuk membuat bujur sangkar (segi empat dengan panjang sisi sama), caranya seperti membuat segi empat biasa. Hanya saja saat melakukan drag (dengan Rectangle Marquee Tool), tekan tombol Shift.

Membuat elips

Untuk membuat elips gunakan Elliptical Marquee Tool.

Membuat lingkaran

Untuk membuat lingkaran gunakan Elliptical Marquee Tool. Hanya saja saat melakukan drag, tekan tombol Shift.

Mengenal Toolbar pada PhotoShop


Thursday 13 November 2008

Saving Bad Photos: Badly Underexposed

Quite frankly, I would much rather have a dark, under exposed photo then an overly bright over exposed photo. With a dark photo, at least there's a chance that there will be enough color data and detail to save the shot. When they're blown away and too bright -- there's little you can do to put pixels where none existed before.

Sad to report however -- so many variables come into play that sometimes the shot cannot be saved no matter what techniques you use।

under exposed photo

One reader who enjoys photographing food on trips sent this photo of the appetizer at the Kia Lodge restaurant at the foot of Kilimanjaro, Tanzania. This was a shrimp and cucumber moose, and it looks delightful. Too bad we really can't see it. Yes, I would certainly try to save that shot because you might not be going back too often!

Fixes in Layers: The next series of shots will progressively show the layers I added, and their results. After that, I'll walk through some "auto" fixes provided in Photoshop and Photoshop Elements.

Blending Mode SCREEN

My first attempt will be to SCREEN the photo over top of itself.
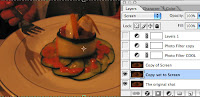
Drag a copy of the layer to a new layer and set the Blending mode to SCREEN। But the results are still wanting... so I'll just drag that same layer to the "New Layer" button and screen it again...

Blending Mode SCREEN


Once again, the image lightens, and we're a little closer to where the photo looks somewhat realistic. To kill much of the incandescent lighting effects -- making the shot too yellow and warm, next, I'll try a cooling filter...
Layer > New Adjustment Layer > Photo Filter > Cooling

Blending Mode SCREEN

This is going in the right direction, however it needs more। There is a slider in the cooling filter which applies more or less of the effect, but I'll leave well enough alone, and simply duplicate this Adjustment layer as well.

Blending Mode SCREEN

At this point the color seems close, but the shot is still murky and dark. Now it's time for LEVELS

Blending Mode SCREEN

LEVELS are your "all purpose" adjustments, second only to Curves as the real power adjuster. As you can see from this shot, by tightening the RIGHT slider toward the middle, and the MIDDLE slider toward the left, the photo now looks comfortable and realistic. Let's compare:

Blending Mode SCREEN

The photo is still a little warm -- evidenced by the lack of 'whiteness' in the plate, but it probably approximates what the diner saw that evening. The photo still has major problems:
It's not sharp, probably due to the low lighting and slow shutter
It's probably also suffering from some hand-held camera movement

Before throwing away a shot that really looks too bad to save, try levels and the assortment of adjustment layers available under the Layer menu. With some experimentation you can save the photo without learning hundreds of pages of Photoshop training material.