Wednesday 28 May 2008

Add Rain Effect to your Photo

This Tutorial will show you how to add realistic rain to your photo. you will do that using Photoshop And ImagReady.


STEP 1 :
Open an image and create a new layer and place the new layer over the image layer in the layer palette .
choose paint bucket tool and fill the new layer with black.
choose filter>> noise >> add noise and adjust settings as follow.
choose filters >> blur >> motion blur and adjust settings as the following:

STEP 2:
create anew layer and place it over the other layers in the layer palette and fill it with black as we do before in the other layer.
Also Apply the add noise filter but increase the amount to "61" instead of "60" and then apply the motion blur filter with the same previous settings.
try this step 2 times but when u apply the noise filter you must increase "1" to the amount (i.e. the 3rd layer "62" and the 4th "63".
Now change the mode of all 4 layers to screen and then change the fill of all layers to 60.
you should see you project like this image:

STEP 3:
select file >> Edit in ImageReady .
in the imageready show the animation palette and layers palette if they are invisible:
To do that :
choose Window >> Timeline
Window >> Layers.
in the animation window at the first frame go to the layer palette and make all layers invisible except the basic image layer and one layer.
After that create a new frame in the timeline. by clicking the "Duplicate current frame" button which is surrounded by a circle in the following image:
Select the new frame and go to the layer palette and hide the already visible layer and make another one visible. as you see in this image.
Repeat this process until you have 4 frames each one contains the basic image layer with only one rain layer.
After that set the time of the frames to 0.1 second
Select file >> Save optimized as .

This is the Final result:


Sunday 25 May 2008

The different stages of photo printing

Both film photos and digital photos can be printer on special photo paper. Printing on photo paper is a process that involves a few stages and is for example very different than printing documents on your printer.Film photos can be printed on photo paper in two stages. The first stage involves developing the film itself into what is known as a negative. The negative is then printed on a special photo printing paper in a process that involves a few chemicals and a few stages. Digital photos on the other hand can be directly printed on photo paper as there is no film to develop and there is no need to create negatives. Printing photo prints on special photo paper involves five stages:Developer. In this stage the photo paper goes through a bath of a chemical that is sensitive to light. Once the photo paper is soaked with this agent and a consistent layer is present on the paper the paper can be exposed to the photo. This is done by using a very high intensity light projector that projects either the negative or directly the digital photo on the paper. The developer chemicals captures the projected photo.Stop bath. In this stage the photo paper goes through a bath of a special chemical that stops the developer chemicals reaction. In other words the stop bath is a chemical that negates the developer chemical characteristics. This is done by the stop bath chemical washing away the developer chemical. Once soaked on the stop bath the developer agent on the photo paper loses its light sensitivity and no longer changes when exposed to light.Fixer. In this stage the photo paper goes through a bath of a special chemical that fixes the captured photo. Although the stop bath stopped the developer chemical from reacting to light the photo is still not stable and not fixed in place. The fixer chemical bath basically washes any residue of unexposed or undeveloped material making the photo paper completely insensitive to light.Washed. In this stage the photo paper is thoroughly washed removing any previous chemicals from it. This stage is very important since any residue of non developer material or other chemical can result in imperfections in the final prints.Dried. This is the last stage. After the photo paper print is washed it is still moist from the chemicals it went through and from the washing agent. The last stage does not involve soaking in any chemical. It is simply implemented by placing the fresh photo prints in an over to dry out. Once dried the photo prints are ready to be used. The different chemicals used are usually reused over and over again. The longer a chemical is used the less effective it is and the more time it needs to complete its job. For that reason for example a fresh developer agent needs to be exposed to light for a shorter time than an older reused agent. At some point the chemicals efficiency is too low to be used anymore and they are safely discarded.

Friday 9 May 2008

Photoshop's Artistic Watercolors

Watercolor has long been a defining Photoshop filter, though the crucial illusion of one color running into its neighbor is only partly achieved. Use the Smudge or Healing Brush tool to help the illusion.
If you're looking to imitate gouache painting, however, search no further -- the slight darkening around the edge of each patch of color perfectly reproduces the effect of this more opaque pigment.
How it works
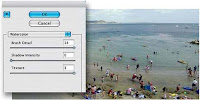
1 The dialog box offers three sliders. Though Brush Detail can be invoked across the whole scale, the remaining controls usually make a color image impossibly dark once pushed past the halfway mark.

2 Settings of 14, 14, and 1 will produce a reasonably painterly result
3 On a monochrome image a "stippled" appearance results from setting Brush Detail at 14, and both Shadow Intensity and Texture at 3. (Click the image above for the before/after enlargement।)

Using the Watercolor Filter
Although it's tempting to be gentle with this filter, often what's required is bravura painting.
1 The ocean scene and distant prospects provide scope for brushwork. (
Click to see original)
2 Testing: Apply the filter to test the waters. Here, we've used Brush Detail 14, Shadow Intensity 1, Texture 1.


As you can see, the initial application is excessively dark.
рей् another approach
It's a good moment to retreat and try another approach.
Go back to the original, and this time use Blur > Motion Blur with a Distance of 6 pixels to break up the image details।

4 Continue with the Diffuse filter from the Stylize menu।
Choose Lighten Only and apply the filter several times in succession by selecting Filter > Diffuse (or Ctrl/Cmd+F).
5 Apply Filter again
View the final masterpiece!
Finally, apply the Watercolor filter again but with Brush Detail 14, Shadow Intensity 0, and Texture 3.
The result is not a bad approximation of a watercolor painting.