Watercolor has long been a defining Photoshop filter, though the crucial illusion of one color running into its neighbor is only partly achieved. Use the Smudge or Healing Brush tool to help the illusion. 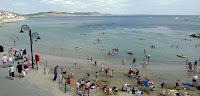
If you're looking to imitate gouache painting, however, search no further -- the slight darkening around the edge of each patch of color perfectly reproduces the effect of this more opaque pigment.
How it works

If you're looking to imitate gouache painting, however, search no further -- the slight darkening around the edge of each patch of color perfectly reproduces the effect of this more opaque pigment.
How it works
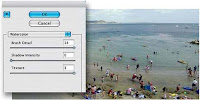
1 The dialog box offers three sliders. Though Brush Detail can be invoked across the whole scale, the remaining controls usually make a color image impossibly dark once pushed past the halfway mark.


2 Settings of 14, 14, and 1 will produce a reasonably painterly result
3 On a monochrome image a "stippled" appearance results from setting Brush Detail at 14, and both Shadow Intensity and Texture at 3. (Click the image above for the before/after enlargement।)
Using the Watercolor Filter
Although it's tempting to be gentle with this filter, often what's required is bravura painting.
1 The ocean scene and distant prospects provide scope for brushwork. (Click to see original)
2 Testing: Apply the filter to test the waters. Here, we've used Brush Detail 14, Shadow Intensity 1, Texture 1.

As you can see, the initial application is excessively dark.
३् another approach
It's a good moment to retreat and try another approach.
Go back to the original, and this time use Blur > Motion Blur with a Distance of 6 pixels to break up the image details।

4 Continue with the Diffuse filter from the Stylize menu।
Choose Lighten Only and apply the filter several times in succession by selecting Filter > Diffuse (or Ctrl/Cmd+F).
5 Apply Filter again
 View the final masterpiece!
Finally, apply the Watercolor filter again but with Brush Detail 14, Shadow Intensity 0, and Texture 3.
The result is not a bad approximation of a watercolor painting.
5 Apply Filter again
 View the final masterpiece!
Finally, apply the Watercolor filter again but with Brush Detail 14, Shadow Intensity 0, and Texture 3.
The result is not a bad approximation of a watercolor painting.


No comments:
Post a Comment